In order to draw realistically, you must first understand how lighting affects form. There are five elements of shading essential to depicting an object’s form realistically.
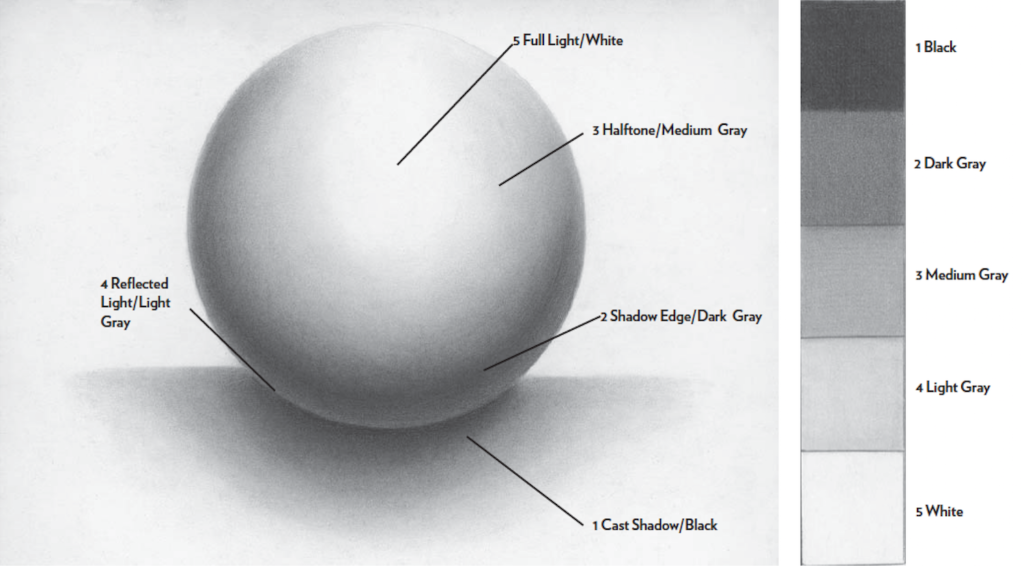
Without a solid foundation of these elements, everything you draw will look flat. Your subject will look three-dimensional only when the effects of light and shadow are properly placed. Each of the five elements of shading can be seen on the sphere below.
1.Cast Shadow
This is the shadow the object you are drawing casts onto a surrounding surface. It is often the darkest part of your drawing because this is where the light is completely blocked. It should be drawn in as close to black as possible. As it comes out from the object, it will start to appear lighter. It is No. 1 on the value scale.
2. Shadow Edge
This is also referred to as a turning shadow. It is not the edge of the object, but rather the shadow on the object that shows it’s a rounded surface. This is a dark gray tone that corresponds with No. 2 on the value scale. You will find this shadow where an object has protruded and the surface recedes to the other side.
3. Halftone
This is the true color of your object, unaffected by the light. It has no shadow and is No. 3 on the value scale.
4. Reflected Light
Look at the sphere above, and you’ll see a subtle rim of light along the edge of the shadow side. This is the light bouncing up from the surface and coming from behind. It is the element most often left out of a drawing. Yet without it separating the shadow edge and cast shadow, your object will look flat.
Be sure to study your reference for the reflected light — it is always seen on the edges, rims or lip of an object. While it is lighter than the shadows, it is still seen on the darker side of the object. It should never be left too white, or it will not look realistic. It is a light gray and corresponds with No. 4 on the value scale.
5. Full Light
This is the part of your subject that receives the most light. It’s No. 5 on the value scale, where the tones fade gently into the white of the paper.
Backgrounds and Edges
Graphite is a foundation medium. The gray tones it produces provide you a means for fully exploring and understanding the importance of value and the five elements of shading we have touched on earlier.
One way you can use value to achieve a better sense of depth in your drawings is to add tone to the background. Notice below how the dark backgrounds affect the look of the shapes. If these shapes were set against white backgrounds, their edges would look much different.
When it comes to drawing shapes, there are two distinct types of edges: hard and soft. Hard edges are found where two surfaces come together or overlap. They are quite defined as their tones create the look of an edge by stopping abruptly. Soft edges can be found in areas when an object bends gently. They have a gradual change in tone.
Background Makes a Difference
When the sphere is placed in front of a toned background, its edges look different compared to the previous sphere with the white background. When drawing, always ask yourself if you are blending light over dark or dark over light.
Hard and Soft Edges
This cone has two distinct types of edges: hard and soft. The soft edge can be found in the curve of the shadow on the rounded surface of the cone. Hard edges are created were the cone overlaps the background and touches the table.
Keep Learning
Now that you have the basics of graphite pencil covered, start practicing! Lee Hammond’s All New Big Book of Drawing is a culmination of the artist’s 40 years of teaching, featuring more the 80 step-by-step projects and tips for both drawing with graphite pencil and colored pencil. Onward, artists!